The Technician – v0.3.0

Update 0.3.0 is live! I decided it would be better to let people start playing around with creating content and sharing it sooner rather than later, so this update has enabled Steam Workshop support for everybody.

The editor and workshop are both pretty rough still, so there’s very little in the way of validation or error checking for user generated content. I expect this will lead to people breaking things in spectacular fashions, which I’m actually hoping will be quite useful in the long run. I also can’t make any promises as to the life expectancy of anything in the workshop, so don’t be too dismayed if your lovingly crafted puzzles vanish or become incompatible with future versions. If that doesn’t scare you off then you can check out the workshop page and get to creating, sharing, and playing custom levels directly from in the game.

Downloading Custom Content

You can find all the workshop levels you’ve subscribed to under the workshop section in the main menu room’s interface and launch directly into playing them from there. You can find and subscribe to new content via either The Technician’s Workshop page, which will show you the full description and a preview image for the level, or in game via a much simpler browsing list that’s accessible from the same menu you launch your custom content from (simply toggle the “Subscribed” slider to “Browse”). Make sure to head back to the workshop page and give votes to the creations you like!

Share Your Custom Content

Sharing your custom content for others to play is also very easily done from an in game interface. Once you’ve loaded into a custom level that you’ve created, you can open the “Sharing” section of the editor menu to see all of your previously uploaded levels. Selecting one of these will allow you to upload your current level as an update to it, or you can choose to publish it as an entirely new workshop item. A simple thumbnail image of your level will automatically be added to the upload, but make sure to add a title and description for your level! You can also un-publish any of your previous creations from here to remove them from the workshop entirely.

Other Changes

There are a few other minor fixes included in this change, as well:

  • Performance improvements for holo windows.
  • Cable physics tweaking.
  • Added cable physics quality settings to options menu.
  • Changed cable auto-dropping to be based on cable stress rather than distance between cable ends.
  • Fixed bug with reverse-connected cable serialization.
  • Updates to asset serialization.
    • There is migration logic in place to attempt to transparently update your old files, but be aware that this may still result in breaking or removing your save files or custom content!

The Technician – v0.2.7

As I mentioned in a previous post, this month’s update is fairly light since I’m tangled up in a bunch of other life activity at the moment. However, I did manage to put together a couple of things to push out:

  • Fixed a bug with Elevator Lock handles flipping out in some specific circumstances.
  • New component, the potentiometer: a dial that can be adjusted to modify incoming data values from 0% to 100% of their original value.
  • New puzzle: ‘Dialing It In’
  • Increased hand touch radius in some areas to aid in grabbing while pointing.
  • Tweaked baseline audio levels.
  • Added sound effects and music volume control options.

Next month should be the last small update before things (hopefully) calm down enough for me to fall back into a regular, albeit reduced, cadence.

The Technician – v0.2.6

0.2.5 just got pushed last week, but it’s already time for 0.2.6! Since the goal of this update is to improve the overall control experience of selecting and grabbing objects, I decided to get it out as soon as possible so I could see how it does and iterate on it more in the next update if necessary.

Always Be Pointing

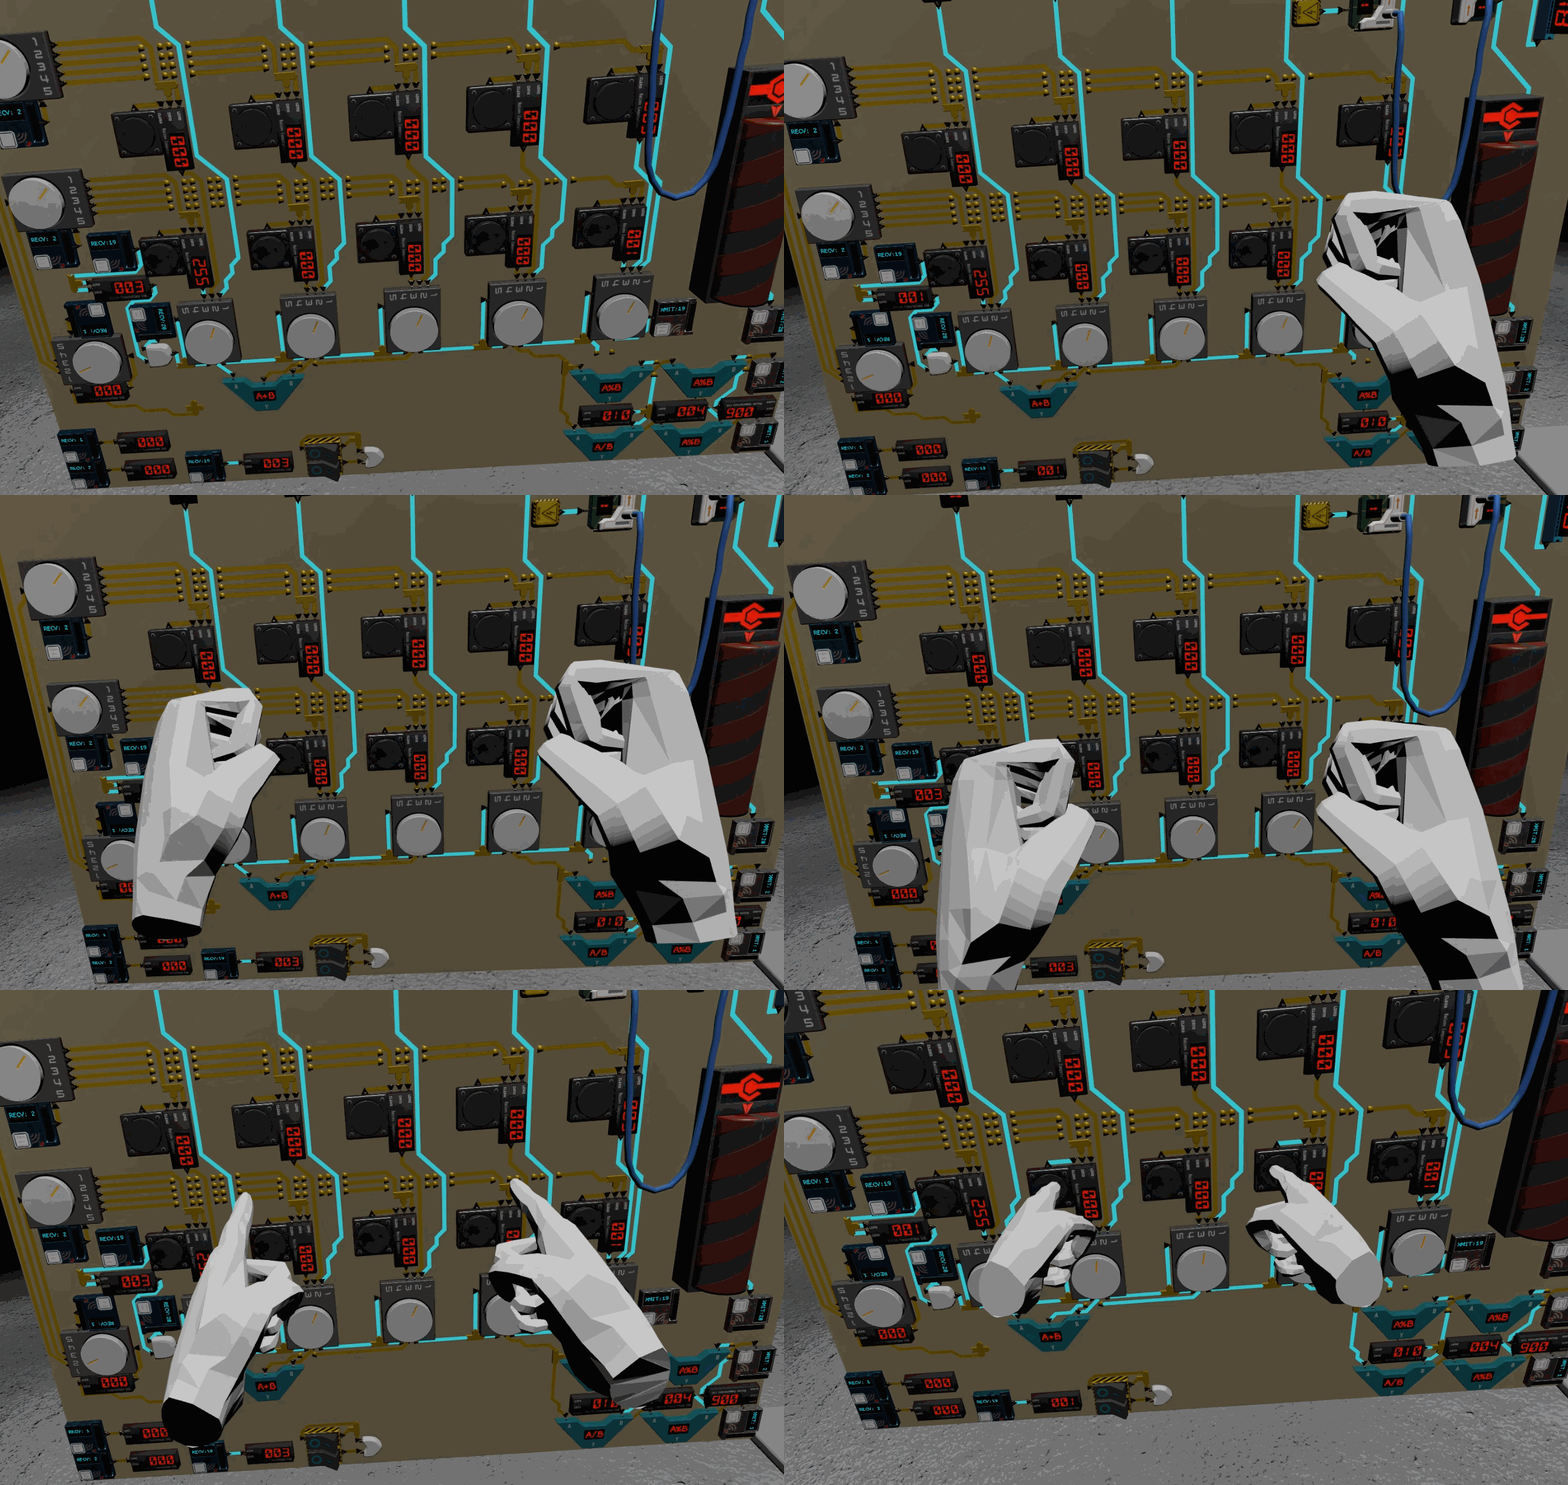
Making grabbing and selection more precise involved a number of changes. First, and most noticeable, is that the technician’s hands now default to the “pointing” state. This seems like a pretty obvious change in retrospect, as the open-handed state never actually had any specific use. Players on Vive would constantly be pressing the trigger to stay in pointing mode anyhow, and Oculus Touch users had to remember to lift their finger from the touch trigger all the time. (Oculus controls now also use the trigger press instead of just the touch state to change pointing mode)

pointing by default

In addition to this just feeling more ‘correct’ for how players interact with switches and buttons and the like, the tip of the index finger is a natural focus point and used for selection when highlighting multiple objects. When touching several interactable objects, the object that is closest to the tip of the finger is the one that “wins” and gets highlighted. When pressing the trigger, you now go straight from pointing at an object to grabbing it, as before.

selecting objects

Since pointing mode is now the default, the old action (pressing the trigger when not highlighting anything) now stops pointing and forms a fist. Is the fist useful? No; no it is not. At least, not yet. It certainly has some pretty obvious implications for future use, though.

Smaller Selection

The hands previously had an ‘aura’ of sorts around them that selected objects that were a little ways away from it. This was a holdover from very early in development, and it no longer provides any benefit (in fact, makes interaction much more difficult in some cases). This has been removed and the hand now only selects objects it is directly touching. As I mentioned above, the index finger is used to determine the ‘closest’ object, but you don’t need to worry about explicitly pointing at your target in most cases; touching, grabbing, and auto-grabbing all work just as they did before.

catching objects

Minor Tweaks

I also added a handful of smaller tweaks including a slower pointing animation, reduced ‘ghosting’ time and distance (for when your hand gets out of sync with controller position), and physics properties. I’m still not quite happy with the physics constraints that move the hands themselves, so I’m sure I’ll continue to tweak these over time. I’d like to implement some smoothing to higher frequency controller movements (to reduce shaking) as well, but haven’t yet found a method of doing so that I like.

Hopefully all of these changes come together to make the controls less frustrating and picky for most players, so try it out and let me know what you think!

Additional patch notes

  • Updated tutorials for new hand controls
  • Fixed tutorial ‘catching’ step to actually require catching
  • Adding light haptics to gunshots
  • Perf updates to connection rendering
  • Fixed bug with connection pins not appearing/moving during editing

The Technician – v0.2.5

The v0.2.5 update is now live in the preview branch! Assuming all goes well, this update will make its way out to the public branch in a couple days. 0.2.5’s major focus was smoothing some of the rough edges off the editor experience so that it could make it out to the rest of the player base, but it also includes a handful of smaller fixes from some fo the Early Access feedback I’ve received thus far. You’ll find more details on the editor below, as well as notes on the rest of the changes in 0.2.5 and some info on what I’m focusing on for the next update.

The Editor and Custom Content

The editor was listed in the original set of features for the game but didn’t make it into the first Early Access release last month, so getting the editor ready to go and putting it out there has been my main focus for the last several weeks. The editor still rough in plenty of areas, but it’s now available for everyone to create some custom puzzles. Currently these boards are only playable locally, but Steamworks support for sharing your custom content on the way.

In the main menu screen, you’ll find an editor holo-tool and a single circuit surface. The editor tool is one of the primary means of interacting with the editor; it serves as the “palette” for spawning all the components you can place, and is also used to draw the hardwired connections between placed components. You can equip the editor tool like a regular technician tool to start using its connector functionality, and can use the selector slider to access sub-menus, one of which includes some further instructions on how to use it.

editor holo tool

Main Menu Editor

The circuit surface in the main menu area is your ‘scratch’ board. You can’t manually save or load the work you do here; it will automatically be saved whenever you leave the menu and is mostly just a place meant for playing around with the editor, coming up with ideas, or making little circuit toys that may take more space than smaller circuit surfaces, like those in the elevator, have. This surface also has a simple slider next to it to toggle between Edit and Play modes.

placing and connecting components

Elevator Editor

You can also launch into edit mode via the Custom Content subsection of the main menu. Here, you can create a new custom board for the primary Elevator level, or load previously created boards in Play or Edit modes. When you launch an Elevator level board in edit mode, you’ll be taken to the familiar playspace with another editor holo-tool and a special edit mode menu by the toolbox. This menu can also save/load other boards, and also allows you to enter a custom name and description for your level.

name and description entry

Configuring Components

A UI has also been added to allow you to configure individual components in the puzzle. This is accessed by hovering a placed component and pressing the menu button on your controller (A/X button on Oculus Touch).

configuring chips

Other 0.2.5 changes

  • Finished the latter half of the final puzzle; should hopefully present a really tough challenge for most players to finish the alpha content with.
  • The injector tool’s buttons have been redone to prevent most accidental presses.
  • Objects can no longer be ‘regrabbed’ by your other hand while they are held or equipped. Accidentally yanking something out of your hand was a common issue, and the regrabbing ‘feature’ didn’t add a whole lot other than allowing players to swap items between hands more easily, which isn’t a super common need. (Dropping the item onto your other hand while it is in ‘autograb’ mode works well in this case, too)
  • Muxer knob collider has been fixed to prevent it from colliding with the edge and being unable to turn.
  • Fixed another muxer bug where it was obeying the knob selector even when receiving input on its override pin.
  • Replaced the per-alarm difficulty setting with a more general percentage based one. Overall alarm level is now adjusted by this modifier (100% = normal difficulty, 0% = no combat at all)
  • Fixed issue where toolbox modules (including incomplete/in-development ones) were enabled on level load in some cases.
  • Fixed bug causing cables to be spawned incorrectly when loading boards multiple times.
  • Drill tool was using the incorrect tethering for its type; it should now correctly return if it’s accidentally knocked out of the playspace.
  • Fixed most of the holo windows that were staring in the wrong state.

What’s Next?

I’m going to continue trying to do updates on a monthly cadence for now, with the following issues being my priority for the next 1-2 updates:

Hand movement and grabbing precision

The most common feedback I’ve gotten is that precisely grabbing things can be very difficult and finicky; and you’re all very correct! I’ve gotten so used to how fiddly grabbing can be over the last couple years that I keep putting off this issue, but it’s definitely time to fix it now. I’m playing with a couple ideas for how to make this a little easier. So far I’m leaning toward changing the hands’ “idle” state to pointing by default. With a single clear focus point on the top of the index finger, this should make it a lot easier to know what you’re pointing at. Smoothing out some of the hand motion to prevent jittering (I have pretty shaky hands, myself) is also something I’m looking into since some of those components can be tricky to handle even when you know precisely where you’re aiming (like really tightly packed-together memory slots.)

Board Sharing

The editor currently lets you make the boards, but you currently can’t share them with other players very easily. Adding in Steamworks support for publishing your content is the next major step in this process, but will likely involve some moderate to large reworking of the level data format and a few other things, so it’ll take a bit longer. I’m spreading some of this work out in smaller steps while working on some of the other critical issues, so it may take more than one update for this to find its way. If the editor proves super popular and there is sufficient user demand, I can shift priorities to get this out sooner. In the meantime, intrepid users that are just *dying* to send their friends levels they’ve made can do so by manually sending the files from their data directory. (Feel free to email if you want some pointers on how to do this.)

More content

This last update added the other half of the final challenge puzzle, but didn’t contain any other new content. While working on other issues I occasionally come back to the editor to work on some new puzzles, but I’d like to spend some dedicated time to get a couple new levels out in the near future. These don’t really need to fall in line with the major updates, so they might find their way out sooner than the next monthly patch.

Other / Stretch

Some other things that are on the list for future updates include: minor playspace fixes (hopefully to make it less claustrophobic feeling), adding graphics or videos to tutorial prompts/messages for clarity, guards “barks” to indicate when they’re advancing, taking cover, throwing grenades, etc., and more!

Development Update: Tools

I missed my September post since I was a bit busy with PAX and working on getting some demos out to a small external audience, so let’s go ahead and use October to cover what I wanted to talk about next: the technician’s tools.

Tools have been a key part of the game concept pretty much since the beginning, but have gotten nowhere near enough development or design time as they’ve needed. Since I’m still aiming on getting The Technician ready for an Early Access release by the end of 2018, it’s time to play catchup on that front and bring a few of the tool designs into the game proper. As usual though, let me start with some general spitballing and summarizing of my current thoughts on how tools should work, what gameplay concepts I’m attempting to drive with them, and how I’m either succeeding or failing (spoilers: it’s mostly the latter) at doing so currently.

The Big Picture

Frantic puzzle solving and working under duress has more or less always been the goal, so: how do the tools help with that? Well, ideally they’ll serve a few different purposes and should:

1 – Give you more options to think about.
2 – Provide different (and hopefully fun) interactions for you to do in game.
3 – Add to the “push/pull” that brings you in and out of danger.

I should probably cover what these things actually mean (at least to me,) too. To the first point: when you’re reading a board and trying to figure out what it is you’re going to do, you should have several options at your disposal. This should make the puzzles feel less linear and give you more of a feeling of actually “hacking” the thing. As for the second: flipping switches and pulling cables starts to get pretty old after a while. Different tools should introduce different interactions to keep gameplay varied. Lastly: it turns out that pulling your attention back and forth between puzzle solving and getting shot at is a tricky thing to do properly. My current attempt to solving this problem is by distributing aspects of puzzle solving to require physical movement between tasks, and the tools are a key method of doing so.

The Tools

Let’s look at what tools are currently kicking around in game and what they do. These tools are all part of “the kit,” a crate full of goodies that the technician and their cohorts have smuggled in to help them with the job or breaking in to whatever it is they’re breaking in to. The kit includes several traditional tools that the tech can grab and use, as well as several built-in, stationary components.

The Injector


The injector is a pretty basic tool that has shown up in some previous posts and images. It’s a handheld device with a corded connector that can attach to several different component with the matching plug. Once connected, the technician can use the buttons on the device (or the buttons on their VR controller) to change the numeric value that the injector is sending. This is obviously most useful when dealing with the parts of puzzles that involve registers, ALUs, or other data-ful components, though any non-zero number will count as power for purposes of the ‘dumber’ components, as well.

The primary design aspect of the injector is that it’s physical and handheld. You need to grab the injector to move and use it, and you need to grab the connector on it to plug it into the various components you want to interact with. This means you’ll need at least one hand free to manipulate it, and the cord on it means you’ll need to be near the circuit boards themselves. The end result is that you’re in a dangerous area with your attention divided and frequently unarmed as you put your gun down to work.

The Rewriter


The registers I talked about in a previous update aren’t the only components capable of storing data. These memory sticks (in a fairly liberal interpretation of RAM) can also store data, and can be move around from memory slot to memory slot. Updating the values in these is often not a simple as updating registers via the injector tool; enter the rewriter. The rewriter is built into the kit itself, meaning that the tech needs to move between the board and the kit as they use it, in contrast to the portable injector which the technician will often bring to the circuitry and leave there. They rewriter isn’t as immediate as the injector either – it needs time to access the mounted devices before it can read/write data to them. In some cases this might mean the player can take a breather in the relatively safer space where the tools are. On the other hand, sometimes the pressure of the encroaching guards can make those extra few seconds very costly.

The Neural Link


The ‘NL’ jack isn’t really a single tool, but rather a whole set of them. It’s also fills the role of a critical cyberpunk staple: cyberwear. This tool is physically attached to the technician at all times. To use it, the tech simply grabs the plug from behind their right ear and yanks it out. Similar to the injector’s plug, the NL plug can be connected to any ‘neural interface’ (or similarly labeled) connector found on various components. Once connected, the tech can interact with the target component via numerous internal programs.

Right now there are two programs to match the two current neural-enabled components. One is a brute force reader program designed for use with some of the blind registers that I talked about previously, replacing the injector-like handheld that you may have seen in that post. The other is an override function that enables you to alter the state of certain power nodes. This also replaces the other injector-like handheld that can be seen interacting with these “aux power” nodes in the announce trailer. Both of these programs take time; the reader takes time to access the target register, and the power override, while fast to activate, only functions as long as it is connected.

In both cases the tech is effectively leashed to the circuit board area by the cable attached to their head, making this another tool enabling puzzle design to dictate the tech’s positioning in the play area (and subsequently, in higher danger.) As I mentioned, it also removed several duplicate handheld tools, and thus the need for me to model and texture new ones (since I was, of course, just reusing the same asset for development.) This is just a happy coincidence and not abject laziness, I assure you.

Summary

The Injector, the Rewriter, and the Neural Interface are the three tools I have today, and hopefully you now understand what they are used for and why I created them.  So how well are they helping to fulfill those primary goals I mentioned before? Unfortunately, not very. They’re a step in the right direction in some places; the injector is a straightforward way to interact with circuit data, the rewriter adds complexity and options to those interactions, and it feels fun to pull a cable out fo your head and plug it into the wall. However, there’s still a lot of work to be done both in tool creation itself and in leveraging them when designing puzzles. The ability to push/pull the technician around is there, but the variety of interactions and available options presented to the player still feels somewhat limited. I hope to remedy this as I continue to add new tools and components to the game, but in the meantime hopefully these ones are still fun for you to use!

Development Update: Leveling Up

This is the second in a series of development updates that I’m going to be posting roughly monthly to keep everyone apprised on the game’s progress, talk openly about how I’m trying to solve game design problems as a first time game designer, and hopefully elicit some feedback and excitement for things to come. This second entry covers my current work on level design.

If you’ve seen the trailer for The Technician, you may have seen a couple environments: one relatively plain/empty “Tutorial Room,” and one more detailed “Server Room” location. The Tutorial Room is relatively straightforward and was easy enough to make (and may not even appear in the final game), so I won’t bother talking about it too much here, but I do want to talk about my thought process behind the Server Room and how things have evolved since then.

The Server Room

My goal for The Technician has always been for it to invoke that under-pressure, keep-your-head-down, bullets-whizzing-by-while-you’re-trying-to-focus feeling. Initially, I tried to do this in part by having all of the hacking take place very low to the ground, basically placing all of the circuitry underneath a “desk” of sorts. Through a series of play tests with friends, I observed that this forced the player to be crouching down almost constantly; not only to dodge incoming attacks, but even just to get to the puzzle.  While this did cause some of the desired feeling of being under pressure, it also quickly became clear that crouching down so much was very uncomfortable and made the entire experience unpleasant. With this play-test feedback in mind, I decided to ditch the always-crouching idea and designed the new Server Room with a few new ideas:

  1. Standing cover: The most prominent feature on the “server” in the Server Room is the large sliding racks on either side of the enclosure. When triggered by a specific component, these racks slide open to expose the main circuit area. The room is designed so that enemies can only approach from two directions, which means that these racks provide complete cover from incoming fire when they’re open. Standing behind these and leaning out to the side to fire at enemies is a much more comfortable experience than ducking the entire time.
  2. Some low cover: When the server’s racks are closed, this high cover is no longer available. Instead, the only protection are the low, cooling structures in between the enclosures. I still wanted to keep some aspect of ducking down/keeping low to encourage that under-fire feeling, so this seemed like an ideal mix to me.
  3. Multiple interaction areas:  The original tutorial room was a series of serial, bite-sized puzzles presented in an obvious sequence – it introduced ideas in a building-block fashion. This is good for learning, but for actual game play I wanted to have larger puzzles, though still be able to separate them into smaller subsections and create a flow between them. Creating the server room was my way of introducing this flow by separating puzzles into sub-sections with challenges of different lengths and difficulties. The enclosure has one main front panel, two large side racks, and several horizontal drawers – all containing circuit surfaces, and all of which are controllable via special components.

In spite of these changes and improvements, it turned out there were a couple of things I didn’t like about how the Server Room turned out:

  1. Ducking: even when it’s infrequent, having to get down and stay there for really any significant period of time continued to be very annoying.
  2. Limited enemy ingress: enemies could only ever approach and attack from the two sides and were corralled toward the player down the narrow hallway between rows of enclosures, making them much easier targets and preventing them from attacking from multiple angles.
  3. Entirely static: The level was entirely fixed and, while the enclosure did provide a lot of circuit surfaces and several compartments that allow for a pretty lengthy puzzle, it was still only ever going to be a single-puzzle kind of space.

Introspecting and Improving

It took time and introspection, but I finally realized that the static nature of the Server Room highlighted a major Real World limitation: that fact that I can really only do so much. Not only is this my first time attempting to make a game, it’s also a completely solo endeavor, meaning that my biggest bottleneck is the amount of time it takes to generate content, particularly content that I’m not experienced at making (which is really just about anything that’s not code.)

In a world where I had more time and money, I would love for The Technician to take place in a bunch of different spaces, each with their own unique environmental interactions and gimmicks. In this world though, I’m rapidly running out of time to make a 2018 release, so I decided to try making one more level that would hopefully fulfill some new requirements I had:

  1. Easy to iterate on: Cover layouts, enemy approaches, circuit board locations, types of puzzles – because The Technician has tons of components that can be combined in different ways, I feel the constant need to tweak, reorganize, and improve in order to eventually (hopefully) create the experience that I’m aiming for. The server room didn’t allow for a lot of experimentation on these without also requiring a whole lot of work to reconfigure the level.
  2. Supports multiple puzzles: Obviously, a puzzle game needs more than one puzzle. Unfortunately, as I already mentioned, I just don’t have the bandwidth to develop multiple levels to match multiple puzzles. So, while the Server Room could only hold one puzzle (to which the player would have to load in, play, leave via either victory or failure, then load again), my new level needed to support all of my puzzles, and allow some sort of flow between them.

With these new goals defined, what did I do to try and fulfill them? The main point of this article is to introduce my new level, so let’s finally get to it and take a look at:

The Space Elevator

The space elevator

Right away you might see the fairly obvious solution to my “multiple puzzles” requirement here: each floor has its own puzzle, and solving it will take you to the next floor (and thus the next set of puzzles). I needed a way to make this mechanic obvious to the player so I also added a few new puzzle pieces, including an elevator override control and elevator locks. The Technician finds the locks and disengages them to enable to elevator override, then hits the override to advance to the next level.
A cargo floor

Elevator controls and locks

This new set-up also helps solve my iteration problem – I designed the cargo elevator to make it easy to try different permutations of cover, enemy approach vectors, and types of puzzles. The circuits themselves are located in compartments of varied layouts on the elevator’s central column, and the tech’s play area is now surrounded by numerous boxes and crates being transported up the shaft along with the player. The crates make for natural cover, and it’s easy for me to move them around while I continue playing with the balance of “puzzle difficulty” versus “getting shot at.” The layout also provides a handy place for all of the technician’s tools and equipment.

In Conclusion

Landing on the right in-game play space for The Technician has required a lot of iteration (and will still require much more,) but it was interesting to uncover how real-world constraints like time and expertise influenced the type of levels I ended up having to design.  Play-testing with real humans helped this process along, as did thinking about how to make my goals achievable as a solo developer via changes in design.  I think the space elevator strikes a good balance between “visually interesting for the player” and “easy to play with permutations of game mechanics.”  Hopefully with a bit more iteration in this new layout, I’ll be able to get a satisfying flow of pressure and problem solving, with natural spikes in tension and adrenaline, as well as resting/recovery points for the player.

Thanks for reading, make sure to drop me some comments and let me know what you think. Next time look out for a post about the various Technician tools and equipment that I created for the game.

Development Update: Simplifying Circuitry

This is the first in a series of development updates that I’m going to be posting roughly monthly to keep everyone apprised on the game’s progress, talk openly about how I’m trying to solve game design problems as a first time game designer, and hopefully elicit some feedback and excitement for things to come. For this first entry, I want to talk about some new circuit components I’ve added to not only expand the types of puzzles in the game, but also to make the puzzles more interactive, more accessible, and simpler to design – without sacrificing challenge. I’m also going to talk about circuits and logic on a more rudimentary level in this post in the hopes that it will help people (who might be unfamiliar with things like logic circuits) understand and feel comfortable with The Technician’s gameplay.

The Basics

If you’ve watched the announce trailer for The Technician, then you’ve seen a few of the basic components that circuit puzzles can be made out of. Power sources, switches, buttons, wires, logic gates like AND and OR, and so on. All of these behave like relatively ‘traditional’ bits of circuitry: they read an “on” signal from their inputs (or don’t), maybe run some rudimentary logic, and send an “on” signal (or don’t) to their outputs. On some level, that’s all a logic circuit really needs; basic gates and the like will let you build all kinds of circuits provided you have the patience and board space. The problem is that complicated circuits are, obviously, complicated. Not everyone is the type of nerd that finds an endless field of boolean gates appealing, either. The bad news is that you’ll probably have to be at least a little bit that kind of nerd to find The Technician appealing, but the good news is that since this isn’t a “real” circuit simulator, we can fudge a lot of things to make complicated circuits simpler, allow for a wider range of interactions, and make it all around more accessible. At least, that’s my hope! Let’s take a look at some specific things that I’m trying in order to accomplish this.

Numbers

This update is all about numbers. Traditional circuitry represents numbers by breaking them down into a series of those “on” and “off” signals. I don’t want to get into a primer on binary numbers here, so let’s just say that this can quickly get very complicated, despite how much your friend with the Computer Science degree might insist otherwise. However, since we’re fudging things, our circuits don’t have to bother with this; they can just send a number directly. When you see a lit wire in The Technician, that “on” signal actually contains data. In this case, that data is a number ranging from 1 to 255, with an “off” signal having a value of 0. Easy! But what do we do with these numbers now that they’re flying around? Let’s start by just saving them.

Registers

If you wanted to build a circuit that stored a numeric value, you could do so with the basic logic gates that I mentioned earlier. This wouldn’t be easy though, and for the player solving this type of puzzle it would be a harrowing experience, at best. Instead, let’s just cheat some more and use these:

A Register

This is a basic register. Registers can receive information on their ‘data’ input, save it when they receive a ‘load’ signal, and continue to send it to their output until they receive a ‘clear.’ They come in a variety of flavors, too. Here’s a quick look at the standard, secure, and readable registers:

Standard

The standard register has a display that handily shows whatever value it is currently holding. Very convenient for the endeavoring technician. Display register

Secure

A secure register is just like a standard one, but decidedly less convenient for would-be hackers. Without a display, the number stored in these isn’t plainly visible and can only be determined by figuring out the source or analyzing the output. Secure register

Readable

Some secure registers aren’t completely secure. These models have ‘maintenance’ ports that a properly-equipped technician can exploit to read the values stored inside. Readable register

Now in addition to being able to move numbers from place to place, we can also hold on to them for future use. So what kind of uses do we have? Let’s start with the obvious one: math!

ALUs

An Arithmetic Logic Unit, or ALU, is kind of like a calculator without a keypad. In keeping with my goal to make things simpler, ALUs in The Technician are simplified versions of the “real” ones. ALUs take up to three inputs (two operands and an operation), do whatever math their current operation dictates, and output the result. To further simplify, these ALUs also have a wider array of more complex operations than are traditionally present. I won’t list all of them here, but let’s take a look at a few notable ones:

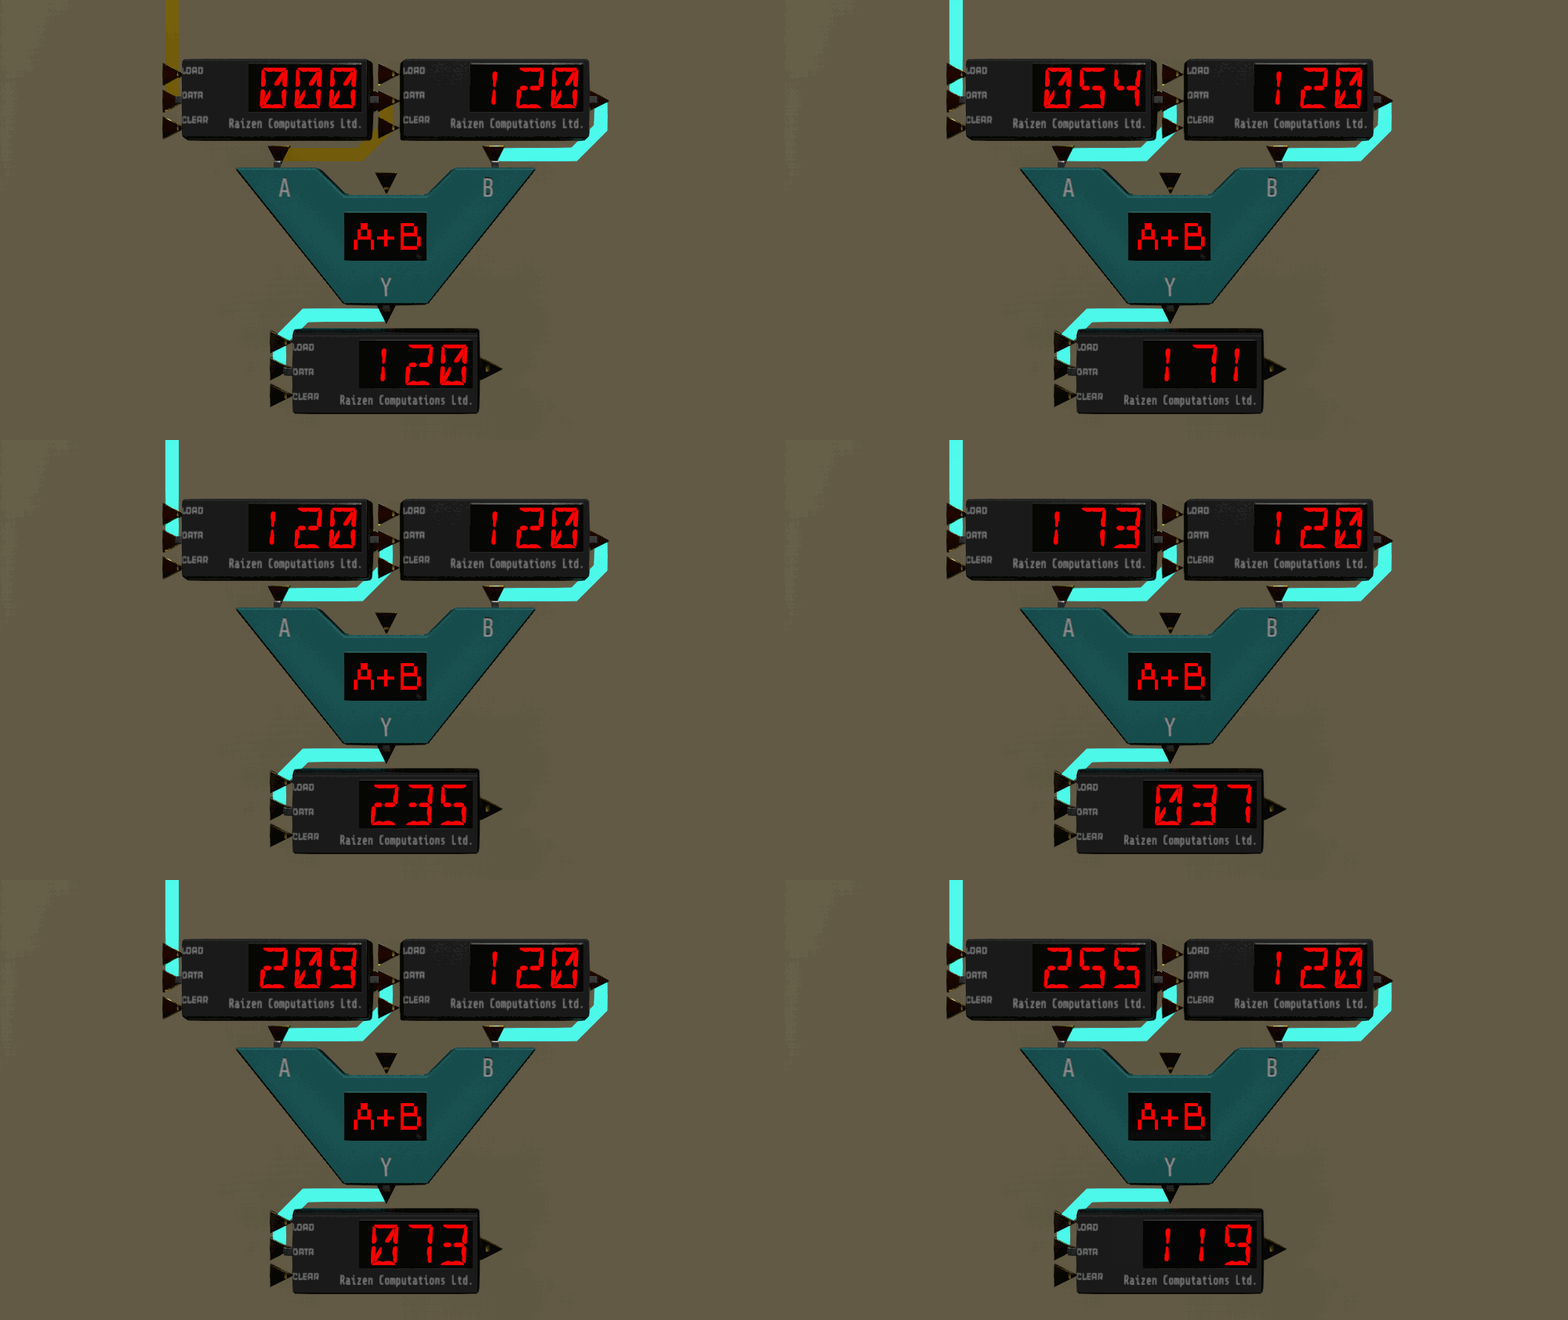
Addition (+)

Doesn’t get much simpler than this; the ALU reads inputs A and B, and outputs A+B. It may be worth noting that numeric values in The Technician only range from 0 to 255, so any operation that results in a value outside of these ranges “wraps around” to the other end of the range. This means 255+1=0, 0-1=255, 255+10=9, etc. ALU Addition
Increment (A+1)

ALUs don’t necessarily need both inputs to function. With the increment (or decrement) function, the ALU reads only one input, adds 1 to it, and send the output. When set up in a ‘loop’ with itself, this can effectively turn the ALU into a counter. ALU Increment

Equality (=)

When set to this operation, an ALU outputs the value that it reads from input A, but when it equals the value it reads from input B. In the case where B is 0, the ALU outputs the maximum value (255) when A is also 0. ALU Equals

Where does all this lead?

These are some basic building blocks that open up a whole lot of potential complexity for circuits, which means that the technician’s job can be made a whole lot harder. It also, I hope, makes it understanding the technician’s job a whole lot easier. Now there are secret numbers need to be ferreted out, values that need to be hacked and changed, and tricky new configurations of logic to be deciphered; not to mention the fact that trying to do math in your head while you’re in a gunfight can be a bit challenging. This also means that the technician now needs tools that can read numbers from components, as well tools for injecting or overwriting values in the circuitry.

I’m hoping this continues to lead to more challenging and fun variations of gameplay in The Technician so keep an eye out for more updates soon and in the meantime leave a comment to let me know what you think!